Suitable types of subfloors and floor preparation.
- The under floor or subfloor must be thoroughly even, dry, clean and
solid. Carpet staples or glue residue must be removed and floor must be
clean to ensure proper installation.
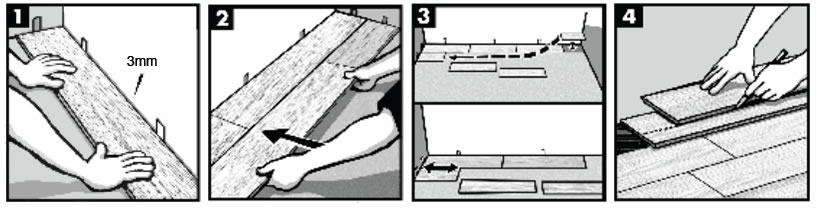
- To check the evenness, hammer a nail into the center of the floor.
Tie a string to the nail and push the knot against the floor. Pull the
string tight to the farthest corner of the room and examine the floor
at eye level for any gaps between the string and the floor. Move
the string around the perimeter of the room noting any gaps larger
than 3mm (1/8”). Any floor unevenness of more than 3mm (1/8”)
per 1 meter (3/2”) must be sanded down or filled with an
appropriate filler.
- Subfloors should be flat within a tolerance of 3mm (1/8") over a span of 4 feet. Any uneveness over 1/8" (3mm) must be sanded down or filled with a floor leveler. Voids or humps in the subfloor will prevent konecto from locking properly
- Subfloors must be carefully checked for moisture problems. KONECTO CLICK is waterproof. It is NOT water proofer. Any moisture problems need to be addressed prior to installation. New concrete floors need to cure for a minimum of 60 days
- If laying konecto over the existing ceramic tile, it will be necessary to skim coat the grout lines with a floor leveler. If you install konecto over the existing floor that has an embossing or grout line or in, you must skim coat with a floor leveler if the embossing or grout line is greater than 1/8" (3mm)
- If you have old, ugly vinyl and don't want to pay for an expensive removal and remediating job, konecto is the perfect answer. Any loose or damaged tiles should be patched prior to installing konecto over the old floor. Never sand old vinyl floors from any floor manufacturer, if you think the floor may be over 20 years old
Tools needed Utility knife & straight edge, measuring tape, shears for cutting around irregular shaped objects (pipes) and 3mm spacers
Planks needed to
complete your project
Measure the length & width of your room.
If the room has alcoves or offsets, measure
these separately. This will give you the
square meters of the room. Purchase a
minimum of 10% extra to cover mistakes,
trimming and for future needs and or
replacement. Most installations require
about 10% overage. However this can
vary depending upon the room size
and layout.
KONECTO CLICK comes in 122cm x 19cm planks
or 0,06 m2 per plank.
8 planks per case = 5,1 m2 per case.
So, if your room is 3,05m x 3,05m or
9,30 m2, we would recommend you
purchase 6 cases (11,2 m2)
CAUTION Do not install KONECTO CLICK over
carpet or any foam underlayment. This
product is not suitable for any outside use,
sunrooms/solariums, saunas, or rooms that
have the potential of flooding. We also
highly recommend you do not install in
rooms or homes that are not temperature
controlled. Exposure to long term direct
sunlight can cause damage to your floor
Condition for KONECTO CLICK prior to installation
You MUST store KONECTO CLICK horizontally in
the room of installation for 48 hours prior
to installation. Be sure the room
temperature is between 18 & 30° C.
Do not remove the planks from the case
during this acclamation period! Maintain
this temperature during installation as well
Helpful hint : When installing KONECTO CLICK be sure to
keep dust, dirt or foreign particles away
from the Locking Strip. The cleaner the
Locking Strip remains, the better the
bond between planks. The KONECTO CLICK
planks are best kept in the box until you
are ready to install them. A protective
sheet of paper has been placed
between each plank insuring the Locking
Strip remains clean and ready to use.
If laying KONECTO CLICK
over existing ceramic tile, it will be
necessary to skim coat the grout lines with
a floor leveler. If you install KONECTO CLICK over an
existing floor that has an embossing or
grout line on it, you must skim coat with a
floor leveler if the embossing or grout line
is greater than 3 mm.
 INSTALLING KONECTO CLICK
HELPFUL HINT : Before laying out
the floor, check the wall you are starting
from and make sure it is square to the
opposite wall. Simply measure the room
from opposite ends of the wall to the far
wall. If the measurements are different you
can make adjustments on the first row of
KONECTO CLICK ( konecto flooring ) by scribing the plank.
STEP 1 Lay a row of loose planks without
securing them to each other first to
determine if you need to adjust the
length of the first plank to avoid a small
piece of less than 30cm on the
opposite wall from where you started or
measure the length of the room and
divide by 122cm (length of one plank).
If the remainder is less than 30cm, calculate ˝ of the remainder and trim
this amount off the first plank. The last
plank should be the same length as the
first one. To cut a plank, simply measure
and mark the plank, then using a
straight edge and utility knife, simply
score the plank and snap. It’s that easy!
STEP 2 Installation should start in a corner (left
hand) and proceed from the wall with
the tongue facing out away from the
wall (Figure 1). Allow a minimum gap of
2-3mm for subfloor movement or
product expansion, which should be
covered by molding.
STEP 3
When laying the first row in a straight
line interlock the the short ends by
inserting the tongue into the grooves at
an angle of approx.15 to 20 degrees.
Install each sequential plank on the
short end 19cm and be sure to line up
evenly. This is very important for a
good installation
STEP 4
Be sure to keep the seams tight. You
will feel and hear the click when
locking the planks together to create a
tight seam. There should be no gap
visible between planks.If your seam appears not to be tight,
you can immediately pull apart the
planks and reapply it. Slowly lift the top
plank away form the bottom plank and
simply reapply them—repeating Step
#3. Be careful not to pull the planks
apart to fast or you could rip or
damage the Locking Strip.
STEP 5
When installing KONECTO CLICK, it is strongly
recommended to stagger the rows so
that the short edge 19cm seams are not
in a straight uniform line. We
recommend the staggered random
method 3’-2’-1’ (Figure 2). However you
may want to try other “patterns” of
planks to suit your taste. KONECTO CLICK can
be installed with endless possibilities—
your only limitation is your own
imagination!
STEP 6
To start the second row with the plank
cut at about 2/3 length 81cm.
Measure and mark the plank, then
using a straight edge and utility knife,
score the plank and snap.
STEP 7
Interlock the plank tightly against
the first row (long side) again at a
15-20 degree angle. The next
plank, interlock the short side first,
leaving it slightly away from the
long side and then slide into the
long side
HELPFUL HINT
When cutting
KONECTO CLICK ( konecto flooring ) for length, be sure to always
cut the short side of the plank with the
groove edge. The remaining piece
can then be used on the opposite side
of the room, at the end of that row
(Figure 3) if layout permits.
STEP 8 Start the third row with the plank
cut at 1/3 of a length 40cm.
Again the remaining piece can be
used at the opposite end of the
row, if the layout of the room
permits
STEP 9 Continue this pattern for the remainder
of the rows to be installed. Always
place the cut end of the first plank
against the wall (Figure 4).
STEP 10 Fitting around irregular objects, no
problem. Simply make a pattern out of
heavy paper to fit around pipes or
irregular objects. Place the pattern upon
the plank and trace. Cut along trace
lines using a utility knife or heavy duty
scissors, and lay plank. Be sure to
leave a minimum of 3mm expansion
space around all fixed objects, floor
vents and door frames.
STEP 11 The beauty of KONECTO CLICK is the ease of
installing the opposite way. You can
install from both sides of the plank. This
allows you to start in one room and
continue through a doorway into another
room with the same pattern and continue
installing the floor forwards or
backwards.
HELPFUL HINT Be sure to keep
some spare KONECTO CLICK ( konecto flooring ) planks in case there
is an unforeseen need for replacement. If
you need to replace a plank of KONECTO CLICK ( konecto flooring ),
simply take a utility knife and cut the bad
plank out along the long side of the plank
only and lift out of place. Then take a
spare plank and cut the tongue and
groove off of the long side of the
replacement plank only. Leave the tongue
and groove on the short side of the plank.
Then simply fit into place and lock the two
short ends into place
IMPORTANT NOTE: Room temperature
when installing KONECTO CLICK ( konecto flooring ). Please make
sure your thermostat is set above
16° C and below 29° C when
installing KONECTO CLICK ( konecto flooring ). Room temperature is important
PREVENTIVE MAINTENANCE
1. Use NON RUBBER protective mats in front of any doors leading to the outside. This helps get the sand and grit from getting on your floors. Gritty sand is the worst enemy of any floor covering.
2. Install proper floor protectors (felt preferred) on all furniture legs used on resilient flooring. Protectors will allow chairs to move easily over the floor without scuffing and scratching .Clean protectors on a regular basis to remove any grit that may have become embedded on the bottom of the furniture leg. For any swiveled type office chairs and other rolling furniture, please install 5cm wide non staining flat casters. Do not use rubber casters
3. To keep your floor looking its best, dust mop or vacuum your floor at least twice a week. Do it more often on floors with heavy traffic. Do not use a household dust cleaner of amy kind as this may cause the floor to become slick or damage the finish. Simply sweep the floor as often as needed.4. Do not allow pets with unclipped nails to damage your konecto floor. It may result in severe scratching to the surface. The same is true for any high heeled shoes that do not have proper tips on the heels.5. Avoid exposure to direct sunlight for prolonged periods of time. During peak sunlight hours, use drapes or blind to minimize the direct sunlight on the konecto floor. Most types of flooring will be affected by continuous strong sunlight. To avoid uneven appearance, please consider relocations of any area rugs from time to time. In addition, excessive temperatures are not good for resilient floors. Some natural ventilation or intermittent air conditinion in vacant homes should be considered. Long term continous inside temperatures over 35°C combine with strong direct sunlight will damage your konecto floor and cause the installation to fail.“
To avoid yellowing from asphalt driveways or parking lots, always use doormats at the entranceways. Its a good idea to use a hard surface floor attachment when vacuuming your konecto floor
FIRST AID FOR YOUR konecto FLOOR
1.You may remove chewing gum, adhensive, crayon, candle wax and similar type of subtances by applying ice until it becomes brittle enough to crumble off. The residue may be removed with mineral spirits
2. Extra deep heel marks, caster marks etc: rub with green Scotch Brite pad dampened with konecto Single Step3. For moderate to heavy stains caused by long standing water or other non dye liquids: Rub with konecto Single Step4. For dark spots caused by ink or other chemicals, clean spot as per #2 above. If not successful, then the effected plank should be replaced. 5. Animal and diaper stains should be traeted same as #3 above6.Cigaratte burns if not deep, then procedure # 2 above should work. If however, they are very deep then the affected plank shold be replaced. "
REGULAR MAINTENANCE
1. Food spills should be cleaned up as rapidly as possible with a quality liquid vinyl cleaner. Make sure cleaner you choose is all purpose liquid cleaner that is NON ABRASIVE. We do not recommend powdered cleaners, oil soaps, dishwashing detergents, or other dusting products. Try to use a non rinsing, biodegradable cleaner that leaves no residue or haze and requires no rinsing after application
2. Shoe marks and scuffs can be easily removed using a spot application of your konecto Single Step
3. Regular household dirt can be cleaned with your konecto. Single Step applied as indicated on products label. Some hand wiping may be required to remove tough spots and spills. Always sweep or vacuum your konecto floor before cleaning so that all loose dirt and particles are removed. For best results do not use combination cleaner/finish products
4. Do NOT WAX your konecto floor! The surface of your konecto is very dense and non porous; this prevents wax from penetrating and thus will build up a bed for yellowing and dirt collection. The same non porous feature also provides all the protection against wear and staining all the protection against wear an dstaining that you will need. Use only konecto Single Step for heavy wear when you have experienced some loos of the original appearance over time. Your konecto floor has been designed to be very easy to maintain, but you may prefer to add an occasional coat of the konecto Single Step to renew and protect your floor. If you cannot locate the konecto Single Step, then please ask your distributor for an equivalent low gloss product.
5. If your floor has been exposed to excessive amounts of water due to flooding, dont panic, KONECTO CLICK is waterproof! Simply remove the water as quickly as possible with Wet-Vac or other devide and ventilate the room. A dehumidifier should be promptly turned on in the room to reduce the moisture levels back to normal. Do not dry the room below the normal moisture level that existed previously
6. If accidental deep scratches appear on your floor, then it might be necessary to replace such damaged tiles. Please refer back to section of replacing a plank of konecto7. If the scratches are fine and the result of normal household use, then it is recommended only to fill them with one or two coats of the good vinyl matte finishing product8. If the problem persists, contact your distributor “ Close up installation video
|